Mastering Product Photography Techniques in London
- Mar 10
- 7 min read
If you want your products to pop online, you need more than just a decent camera. You need to master product photography techniques that grab attention and make your brand unforgettable. Whether you’re selling on social media, an e-commerce site, or crafting eye-catching ads, the right photos can make all the difference. And guess what? London is bursting with creative energy and resources to help you nail it.
Let’s dive into how you can elevate your product shots, step up your visual game, and create images that truly sell.
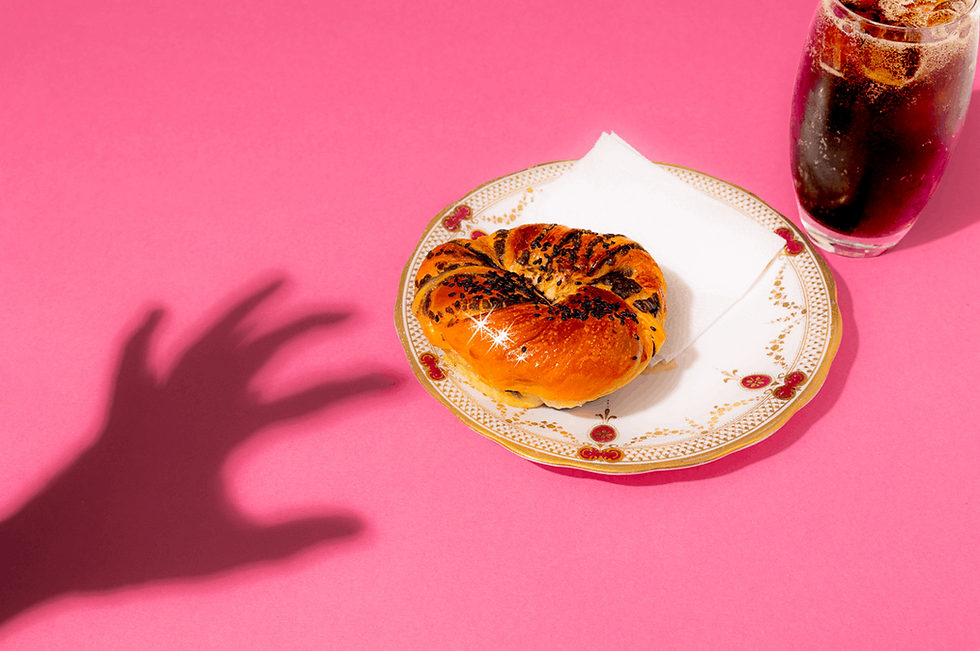
Why Product Photography Techniques Matter
You might think snapping a quick photo is enough. But here’s the truth: great product photography is a skill. It’s about lighting, angles, background, and storytelling all rolled into one. When done right, your photos don’t just show a product - they sell a lifestyle, a feeling, a promise.
Imagine scrolling through your feed. What makes you stop? Usually, it’s a sharp, vibrant image that tells a story in a split second. That’s the power of mastering product photography techniques.
Here’s why it’s crucial:
Builds trust: Clear, professional photos show you care about quality.
Boosts sales: People buy with their eyes first.
Enhances brand identity: Consistent style makes your brand memorable.
Improves engagement: Stunning visuals get more likes, shares, and comments.
So, how do you get there? Let’s break down the essentials.
Essential Product Photography Techniques You Need to Know
Ready to get hands-on? Here are some core techniques that will transform your product shots from meh to magnificent.
1. Lighting is Everything
Lighting can make or break your photo. Natural light is a fantastic starting point. Shoot near a large window with soft, diffused light for a clean, natural look. Avoid harsh direct sunlight that creates unwanted shadows.
If you’re indoors or want more control, invest in a simple lighting setup:
Use softboxes or ring lights to create even, flattering light.
Position lights at 45-degree angles to your product for depth.
Use reflectors or white cards to bounce light and fill shadows.
2. Choose the Right Background
Your background should complement, not compete with, your product. White or neutral backgrounds are classic for a reason - they keep the focus on the item.
But don’t be afraid to experiment:
Use textured surfaces, such as wood or fabric, for warmth.
Try coloured backdrops that match your brand palette.
Keep it simple to avoid distractions.
3. Master Your Angles
Different products shine from different angles. Experiment with:
Eye-level shots for a straightforward, honest view.
Close-ups to highlight details and textures.
High angles to show the product in context or flat lays.
Try multiple angles and pick the ones that best tell your product’s story.
4. Use Props Wisely
Props can add context and personality, but don’t overdo it. Choose items that enhance your product’s story without stealing the spotlight.
For example, a coffee mug looks great with coffee beans or a cosy blanket nearby. But keep props minimal and relevant.
5. Focus on Composition
Good composition guides the viewer’s eye. Use the rule of thirds to place your product off-centre for a dynamic look. Leave some breathing space around the product to avoid clutter.
6. Post-Processing Magic
Editing is your secret weapon. Adjust brightness, contrast, and sharpness to make your product pop. But keep it natural - over-editing can mislead customers and hurt trust.
Use tools like Adobe Lightroom or free apps like Snapseed to polish your shots.

How to Find the Best Spots and Studios in London
London is a creative hub packed with amazing studios and locations perfect for product photography. Whether you want a sleek white studio or a quirky urban backdrop, the city has it all.
Here’s how to find your ideal spot:
Look for studios with natural light: Many London studios offer daylight studios perfect for product shoots.
Check out creative hubs: Areas like Shoreditch and Hackney are full of artistic spaces.
Consider accessibility: Choose locations easy for your team and equipment to reach.
Book in advance: London’s creative spaces get snapped up fast, so plan.
If you want to work with pros who know the city and the craft, consider partnering with a studio that specialises in product photography. They bring expertise, equipment, and creative flair to the table.
Tips for Shooting Animated Product Content
Static images are great, but animated content like stop motion and GIFs can really boost engagement on social media. Here’s how to get started:
Plan your story: What do you want to show? Unboxing, product use, or transformation?
Keep it short and sweet: Attention spans are short, so aim for 5-10 seconds.
Use a tripod: Keep your camera steady for smooth animation.
Shoot frame by frame: Move your product slightly between shots.
Edit with care: Use apps like Stop Motion Studio or Adobe Premiere to compile your frames.
Animated content adds personality and can make your brand stand out in crowded feeds.

Bringing It All Together: Your Next Steps
Now that you know the key product photography techniques, it’s time to put them into action. Here’s a quick checklist to get you started:
Scout your location - Find a spot with great light and a clean background.
Set up your lighting - Use natural or artificial light to highlight your product.
Choose your angles - Experiment with different views to find the best.
Add props carefully - Enhance your story without clutter.
Shoot multiple shots - More options mean better final picks.
Edit thoughtfully - Polish your images but keep them real.
Try animated content - Add movement to catch eyes on social media.
If you want to elevate your brand with professional help, consider working with experts who specialise in product photography in London. They understand the local scene and can help you create stunning visuals that boost engagement and sales.
Remember, every product has a story. Your photos should tell it loud and clear. So grab your camera, get creative, and watch your brand shine!
Mastering product photography techniques is a journey, but with the right approach and a bit of practice, you’ll be creating images that truly captivate. Ready to make your products the star of the show? Let’s get shooting!
Frequently Asked Questions: Mastering Product Photography Techniques
Why is product photography so important for my online business?
It's simple: high-quality product photography is the foundation of successful e-commerce. Since your customers can't physically interact with your items, your images must do the selling for you. Mastering product photography techniques builds immediate trust with potential buyers, significantly boosts conversion rates by showing your product in the best light, and strengthens your overall brand identity. In a crowded marketplace, professional photos are what stop a scrolling customer from becoming a paying customer.
What are the most essential product photography techniques for beginners?
If you are starting out, focus on these core areas:
Lighting Mastery: Start with soft, diffused natural light from a window. Avoid harsh direct sun.
Background Choice: Use a clean, neutral background (like white seamless paper or fabric) to keep the focus on your product.
Angle Experimentation: Don't just take one photo. Shoot from eye level, from above for flat lays, and get close-ups to capture texture and details.
Solid Composition: Apply the rule of thirds to place your product off-centre for a more dynamic, engaging image.
How can I improve my product photos without buying expensive studio equipment?
You absolutely can! The best way to improve is by mastering natural light. Shoot near a large window on a cloudy day for beautifully diffused light. You can create a DIY lighting setup using white foam boards from an art shop as reflectors to bounce light back onto the product and fill in shadows. For backgrounds, use simple materials such as textured paper, fabric, or a clean wall. Your smartphone camera, combined with free editing apps like Snapseed, is incredibly powerful for creating e-commerce visuals.
Where are the best locations for a product photography studio in London?
London is a fantastic city for creatives. To find the perfect spot for your shoot, consider these tips:
Search for Daylight Studios: Many spaces across the city, particularly in areas like Shoreditch, Hackney, and Bermondsey, specialise in studios flooded with natural light, which is ideal for product work.
Look for Creative Hubs: These areas are filled with unique, rentable spaces that offer everything from minimalist white walls to gritty urban textures.
Plan Ahead: The best creative spaces in London book up quickly, so it’s wise to reserve your spot well in advance.
Consider a Professional Partner: Working with a dedicated product photography studio in London gives you access to top-tier equipment, expert lighting knowledge, and a team that knows how to capture the best shots in the city.
What's the best way to photograph reflective products like jewellery or glass?
Shooting reflective items is one of the more advanced product photography techniques because they mirror everything around them, including you and your camera.
The secret is to create a light tent or use a softbox to light the reflection itself, rather than the product. You are essentially photographing the light surrounding the object. Use diffusion material to create a large, soft light source that wraps around the reflective surface, producing beautiful, clean highlights rather than harsh hotspots.
How do I create engaging animated content for social media?
Animated content, like stop-motion videos and GIFs, is fantastic for boosting social media engagement. Here is a quick guide to get you started:
Plan Your Story: Decide on a simple narrative, such as unboxing, assembling the product, or showing a before-and-after transformation.
Keep it Concise: Aim for a short loop of 5-10 seconds to hold the viewer's short attention span.
Stabilise Your Camera: A sturdy tripod is non-negotiable. Your camera must not move between shots.
Shoot Frame by Frame: Take a photo, move your product slightly, and repeat. The smaller the movement, the smoother the animation.
Use Editing Apps: Compile your frames easily with apps like Stop Motion Studio or professional software like Adobe Premiere Pro.
What are the best editing techniques for product photos?
Post-processing is where your images come to life. The key is to enhance, not deceive. Focus on these adjustments:
Exposure and Contrast: Fine-tune the brightness and contrast to make the product stand out.
White Balance: Ensure the colours are accurate and true to life, which is critical for building customer trust.
Sharpening: Apply a subtle sharpening effect to make details and textures pop.
Spot Removal: Use healing tools to remove dust spots and minor imperfections in the background.
How do I ensure my product photos have a consistent brand style?
A consistent brand identity across your visuals makes your business instantly recognisable. To achieve this, create a shoot plan before you start. Decide on a specific colour palette that matches your brand, use the same types of backgrounds or props for every shoot, and apply a consistent filter or editing preset to all your photos. This uniformity across your website, social media, and ad campaigns creates a professional, memorable brand image.
Comments